Spring Boot 3.3 + Netty 构建千万级 IM 系统的最佳实践
即时通讯(IM)系统在现代互联网应用中发挥着至关重要的作用,从社交软件到企业内部通讯,IM系统承载了巨大的并发流量和实时性要求。如何在保证高并发处理的同时,做到低延迟和高效的消息传输,是IM系统设计中的核心问题。 本文将带你一步步揭示如何通过Spring Boot和Netty技术栈搭建一个支持千万级别用户的IM系统,着重介绍Netty在网络通讯中的应用优势,以及如何通过前端jQuery与Netty的WebSocket进行高效的消息通讯。无论是后端的网络架构还是前端的交互实现,我们都将详细讲解其核心技术点。 Netty的详细介绍 什么是Netty? Netty是一个基于Java的异步事件驱动网络应用框架,它简化了网络编程的开发难度。通过Netty,你可以轻松构建高性能、高吞吐量的网络应用,尤其是处理IO密集型场景。相比于传统的阻塞式网络编程模型,Netty通过NIO(非阻塞IO)模型实现了异步通信,使得单台服务器可以高效处理成千上万的并发连接,适合构建大型即时通讯(IM)系统。 Netty核心特性包括: 异步与事件驱动:通过Selector机制,减少阻塞等待,提升并发处理能力。 高性能和低延迟:Netty通过NIO技术减少了IO阻塞时间,提供更优的响应性能。 灵活的架构设计:提供多种编码解码器,方便不同协议的处理。 广泛的应用场景:Netty不仅适用于IM系统,还适用于RPC框架、HTTP服务器和分布式系统。
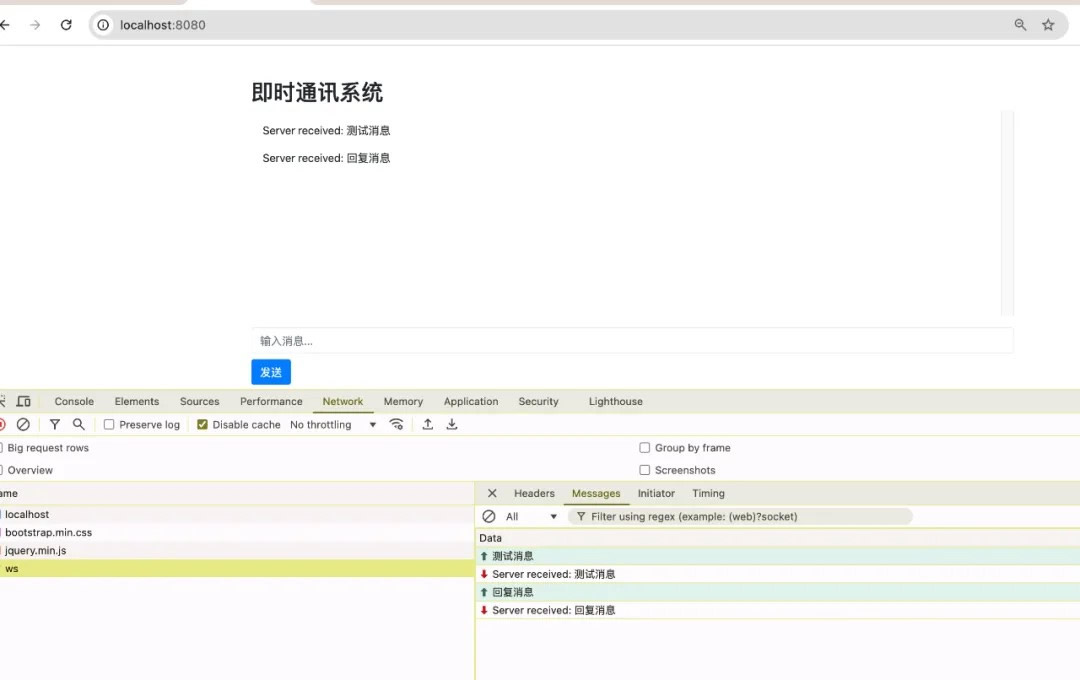
为什么选择Netty构建IM系统? IM系统要求服务器能够处理大量的并发连接,并能够实时处理和传递消息。传统的阻塞式网络架构在处理高并发时容易遇到性能瓶颈,而Netty的非阻塞、异步模型则极大提高了服务器的扩展性,减少了资源消耗。通过Netty,我们可以构建一个支持千万级别连接的IM系统,同时保持较低的延迟和高吞吐量。 前端通过jQuery实现消息通讯 前端与Netty服务器的交互采用了WebSocket协议,通过WebSocket,客户端与服务器可以实现全双工通信,即客户端和服务器可以互相发送和接收数据,而不需要频繁建立和断开连接。这使得消息传递的效率得到了显著提升,尤其适合即时通讯这种需要实时双向数据交换的场景。 jQuery在前端简化了与WebSocket的交互,同时通过Bootstrap对页面进行美化,使用户体验更为流畅。通过浏览器的WebSocket API,我们可以轻松与Netty服务器建立长连接,并通过简单的事件机制实现消息的接收和展示。 运行效果:
Spring Boot 3.3 + Netty 构建千万级 IM 系统的最佳实践

若想获取项目完整代码以及其他文章的项目源码,且在代码编写时遇到问题需要咨询交流,欢迎加入下方的知识星球。 接下来我们会从后端的Netty服务器搭建开始,逐步介绍如何构建这个IM系统。 项目环境配置 项目依赖(pom.xml) 在pom.xml中,项目的核心依赖包括Spring Boot、Netty、Thymeleaf以及前端的相关依赖。以下是项目的主要依赖配置: - <?xml version="1.0" encoding="UTF-8"?>
- <project xmlns="http://maven.apache.org/POM/4.0.0" xmlns:xsi="http://www.w3.org/2001/XMLSchema-instance"
- xsi:schemaLocation="http://maven.apache.org/POM/4.0.0 https://maven.apache.org/xsd/maven-4.0.0.xsd">
- <modelVersion>4.0.0</modelVersion>
- <parent>
- <groupId>org.springframework.boot</groupId>
- <artifactId>spring-boot-starter-parent</artifactId>
- <version>3.3.3</version>
- <relativePath/> <!-- lookup parent from repository -->
- </parent>
- <groupId>com.icoderoad</groupId>
- <artifactId>netty-im</artifactId>
- <version>0.0.1-SNAPSHOT</version>
- <name>netty-im</name>
- <description>Demo project for Spring Boot</description>
-
- <properties>
- <java.version>17</java.version>
- </properties>
- <dependencies>
- <dependency>
- <groupId>org.springframework.boot</groupId>
- <artifactId>spring-boot-starter</artifactId>
- </dependency>
-
- <!-- Netty依赖 -->
- <dependency>
- <groupId>io.netty</groupId>
- <artifactId>netty-all</artifactId>
- <version>4.1.68.Final</version>
- </dependency>
-
- <!-- Thymeleaf依赖 -->
- <dependency>
- <groupId>org.springframework.boot</groupId>
- <artifactId>spring-boot-starter-thymeleaf</artifactId>
- </dependency>
-
- <!-- Web依赖 -->
- <dependency>
- <groupId>org.springframework.boot</groupId>
- <artifactId>spring-boot-starter-web</artifactId>
- </dependency>
-
- <!-- Jackson JSON 解析 -->
- <dependency>
- <groupId>com.fasterxml.jackson.core</groupId>
- <artifactId>jackson-databind</artifactId>
- </dependency>
-
- <!-- lombok -->
- <dependency>
- <groupId>org.projectlombok</groupId>
- <artifactId>lombok</artifactId>
- <scope>provided</scope>
- </dependency>
- <dependency>
- <groupId>org.springframework.boot</groupId>
- <artifactId>spring-boot-starter-test</artifactId>
- <scope>test</scope>
- </dependency>
-
- </dependencies>
- <build>
- <plugins>
- <plugin>
- <groupId>org.springframework.boot</groupId>
- <artifactId>spring-boot-maven-plugin</artifactId>
- </plugin>
- </plugins>
- </build>
- </project>
配置文件(application.yml) 通过application.yml来配置Netty服务器的主机地址和端口号: - server:
- port: 8080
- netty:
- host: 127.0.0.1
- port: 8888
- bossThread: 1
- workerThread: 4
为了读取这些配置信息,我们使用@ConfigurationProperties来封装: - package com.icoderoad.nettyim.config;
- import org.springframework.boot.context.properties.ConfigurationProperties;
- import org.springframework.stereotype.Component;
- import lombok.Data;
- @Data
- @Component
- @ConfigurationProperties(prefix = "netty")
- public class NettyProperties {
-
- private String host;
- private int port;
- private int bossThread;
- private int workerThread;
- }
WebSocketFrameHandler 类处理 WebSocket 帧的接收和发送。以下是一个基本的示例,演示如何创建这个类: - package com.icoderoad.nettyim.handler;
- import io.netty.channel.ChannelHandlerContext;
- import io.netty.channel.SimpleChannelInboundHandler;
- import io.netty.handler.codec.http.websocketx.CloseWebSocketFrame;
- import io.netty.handler.codec.http.websocketx.PingWebSocketFrame;
- import io.netty.handler.codec.http.websocketx.PongWebSocketFrame;
- import io.netty.handler.codec.http.websocketx.TextWebSocketFrame;
- import io.netty.handler.codec.http.websocketx.WebSocketFrame;
- public class WebSocketFrameHandler extends SimpleChannelInboundHandler<WebSocketFrame> {
- @Override
- protected void channelRead0(ChannelHandlerContext ctx, WebSocketFrame frame) throws Exception {
- if (frame instanceof TextWebSocketFrame) {
- // 处理文本消息
- String request = ((TextWebSocketFrame) frame).text();
- System.out.println("Received message: " + request);
- // 回复消息
- ctx.channel().writeAndFlush(new TextWebSocketFrame("Server received: " + request));
- } else if (frame instanceof PingWebSocketFrame) {
- // 处理 Ping 帧
- ctx.channel().writeAndFlush(new PongWebSocketFrame(frame.content().retain()));
- } else if (frame instanceof PongWebSocketFrame) {
- // 处理 Pong 帧
- System.out.println("Received Pong");
- } else if (frame instanceof CloseWebSocketFrame) {
- // 处理关闭帧
- System.out.println("WebSocket closed");
- ctx.channel().close();
- } else {
- throw new UnsupportedOperationException("Unsupported frame type: " + frame.getClass().getName());
- }
- }
- @Override
- public void exceptionCaught(ChannelHandlerContext ctx, Throwable cause) {
- cause.printStackTrace();
- ctx.close();
- }
- }
在NettyServer 类中,使用 WebSocketFrameHandler 处理 WebSocket 请求。确保 ChannelInitializer 中添加了 WebSocketServerInitializer 这个处理器。 - package com.icoderoad.nettyim.server;
- import com.icoderoad.nettyim.handler.WebSocketFrameHandler;
- import io.netty.channel.ChannelInitializer;
- import io.netty.channel.socket.SocketChannel;
- import io.netty.handler.codec.http.HttpObjectAggregator;
- import io.netty.handler.codec.http.HttpServerCodec;
- import io.netty.handler.codec.http.websocketx.WebSocketServerProtocolHandler;
- import io.netty.handler.stream.ChunkedWriteHandler;
- public class WebSocketServerInitializer extends ChannelInitializer<SocketChannel> {
- @Override
- protected void initChannel(SocketChannel ch) throws Exception {
- ch.pipeline().addLast(new HttpServerCodec());
- ch.pipeline().addLast(new ChunkedWriteHandler());
- ch.pipeline().addLast(new HttpObjectAggregator(64 * 1024));
- ch.pipeline().addLast(new WebSocketServerProtocolHandler("/ws")); // 确保路径一致
- ch.pipeline().addLast(new WebSocketFrameHandler());
- }
- }
Netty服务端实现 通过Netty实现服务端,我们使用ServerBootstrap来配置并启动服务器。以下是Netty服务端的核心代码: - package com.icoderoad.nettyim.server;
- import org.springframework.beans.factory.annotation.Autowired;
- import org.springframework.boot.ApplicationRunner;
- import org.springframework.context.annotation.Bean;
- import org.springframework.stereotype.Component;
- import com.icoderoad.nettyim.config.NettyProperties;
- import io.netty.bootstrap.ServerBootstrap;
- import io.netty.channel.ChannelFuture;
- import io.netty.channel.EventLoopGroup;
- import io.netty.channel.nio.NioEventLoopGroup;
- import io.netty.channel.socket.nio.NioServerSocketChannel;
- @Component
- public class NettyServer {
- @Autowired
- private NettyProperties nettyConfig;
- @Bean
- public ApplicationRunner startNettyServer() {
- return args -> {
- EventLoopGroup bossGroup = new NioEventLoopGroup(nettyConfig.getBossThread());
- EventLoopGroup workerGroup = new NioEventLoopGroup(nettyConfig.getWorkerThread());
- try {
- ServerBootstrap bootstrap = new ServerBootstrap();
- bootstrap.group(bossGroup, workerGroup)
- .channel(NioServerSocketChannel.class)
- .childHandler(new WebSocketServerInitializer());
- ChannelFuture future = bootstrap.bind(nettyConfig.getHost(), nettyConfig.getPort()).sync();
- future.channel().closeFuture().sync();
- } finally {
- bossGroup.shutdownGracefully();
- workerGroup.shutdownGracefully();
- }
- };
- }
- }
视图控制类 - package com.icoderoad.nettyim.controller;
- import org.springframework.stereotype.Controller;
- import org.springframework.web.bind.annotation.GetMapping;
- @Controller
- public class IndexController {
- @GetMapping("/")
- public String index() {
- return "index";
- }
-
- }
前端实现 前端部分主要负责消息的发送和展示。我们使用Thymeleaf模板引擎渲染HTML页面,通过jQuery和WebSocket进行实时的消息交互。 在 src/main/resources/templates 目录下创建 index.html 文件: - <!DOCTYPE html>
- <html xmlns:th="http://www.thymeleaf.org">
- <head>
- <title>IM系统</title>
- <link rel="stylesheet" href="https://cdn.bootcdn.net/ajax/libs/twitter-bootstrap/4.6.0/css/bootstrap.min.css">
- <script src="https://cdn.bootcdn.net/ajax/libs/jquery/3.6.0/jquery.min.js"></script>
- </head>
- <body>
- <div class="container">
- <h2 class="mt-5">即时通讯系统</h2>
- <div id="message-container" class="border p-3" style="height: 300px; overflow-y: scroll;">
- </div>
- <input type="text" id="message-input" class="form-control mt-3" placeholder="输入消息...">
- <button class="btn btn-primary mt-2" onclick="sendMessage()">发送</button>
- </div>
- <script>
- var socket = new WebSocket("ws://127.0.0.1:8888");
- socket.onmessage = function (event) {
- $('#message-container').append('<p>' + event.data + '</p>');
- };
- function sendMessage() {
- var message = $('#message-input').val();
- socket.send(message);
- $('#message-input').val('');
- }
- </script>
- </body>
- </html>
在前端页面中,用户输入消息后,通过sendMessage()函数将消息发送给Netty服务器,服务器处理后再将响应消息通过WebSocket返回,显示在消息区域中。 总结 本文详细介绍了如何使用 Spring Boot 与Netty构建一个高并发的IM系统,从 Netty 的异步通信原理,到前端如何使用 jQuery 实现消息的实时传输,我们深入分析了每个技术点的细节。通过这种架构,我们可以实现高效、稳定的即时通讯系统,具备低延迟和高并发的特性,适用于社交平台、在线客服等多种场景。 这种基于 Netty 和 WebSocket 的实现方式,不仅在性能上表现优越,也为大规模 IM 系统的构建提供了技术保障。在未来的应用中,我们可以进一步优化协议和消息传输机制,以满足更加复杂的业务需求。
|  |免责声明|小黑屋|依星资源网
( 鲁ICP备2021043233号-3 )|网站地图